Making Cool Titles in Photoshop for iMovie (or any video editing software)
So you wanna make cool titles in photoshop. here's how.
PREFACE: You should know that this process is way easier in After Effects. But if you're too cheap or lazy to get the software, you can make some cool stuff in Photoshop. We'll essentially be making GIF pngs, so you can use this as a layover in any video editing software from iMovie to Premiere.
ALSO, DOWNLOAD MY COMPLETED ANIMATION PSD HERE. If you're a visual learner and want to follow along, this will help. Or maybe you just want to steal my stuff. Either one works. If you don't have photoshop, click THIS LINK here! Now let's begin.
1. Get some printer paper and draw whatever words/shapes you'd like to have dancing around. Don't worry about it being perfect, because you can tweak your image in photoshop. Notice how I tried writing letters in "Puerto Rico" multiple times until I got them how I wanted. Once you have what you like, take a photo of the paper (I just used my iphone) and send it to your computer. Make sure there's decently even lighting on this paper when you shoot the photo (I just shine a lamp next to the page).

Drawing with sharpies
2. Open this image in Photoshop, and then select "Image > Adjustments > Threshold". This will convert your image into perfect black and white, making it easier to select your letters. I've found a threshold level of 128 to be perfect, but play around with it until you have perfectly sharp, black letters while the paper remains white.
3. Hit "Select > Color Range" and bring the fuzziness to 200. Hit "okay" and you'll now only have the black lettering selected. Copy and paste this current selection and you'll now have ONLY your letters selected.

Nice and fuzzy

Once you've copy and pasted your color range selection and turned off your white background layer, you should have this.
4. Using the polygon lasso tool (shortcut: press L) and select the letters you'd like to use. Copy and paste each letter so you have individual layers for each letter you want to use. Rename the layers after the letter to make life easier on yourself.
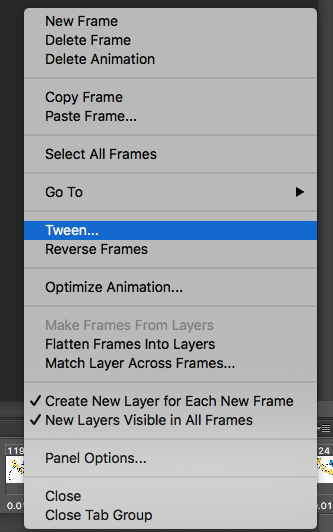
5. Select "Window > Timeline" to begin your animation process. There are only a few features you need to know about timeline. That page button on the bottom duplicates your selected frame, the trash can deletes your selected frames, and you'll find a "tween" button when you select the arrow in the top right corner or the timeline bar. Tweening is incredibly handy, as it lets you fill in frames between letter shifts to make the movement smoother.

6. Diagram out how you'd like the letters to move. I started my animation by arranging the letters how I'd like them to assemble and diagraming how they'd move into and out of this assembly.

My movement diagram (note that I used the "fill" button (press g) to add some coloring to my letters. You can do this any step of the way. Since this is a PNG, you can leave your letters unfilled and they'll only be the outline. This also looks awesome (see image blow)

This is how your layers will look. If you start a new layer for a tracking diagram, make sure it's BELOW your other layers so it's not covering them.

Clear lettering can look rad. Told you so.
7. Now we're going to work on the ENTRY sequence, where the letters come into frame and assemble into "Puerto Rico". Since your letters are already perfectly assembled, we're going to work backwards and have them exit the frame. Then, we'll reverse the order.
See those notches in my track diagram? Those represent how much the letters need to move between each frame. Remember that the "tween" feature can fill in movement to make sure everything comes out smooth. So if you want the letters to come in at a straight direction, you only need to make two frames and and add tweening between them for the perfect animation. However, since I wanted my letters to come in a circle, I had to add many frames to ensure they come in smoothly, even with tweening.
Start by hitting the "duplicate selected frame" button right next to the trash can in the timeline bar. With this new frame, select the layer of the letter you'd like to move and place it wherever you'd like. Once this letter has been moved, select the frame of your next letter and repeat the process. DO NOT hit enter once you've moved each letter, because this will apply the adjustment to EVERY frame in your timeline rather than only your selected frame. I've also found that rotations apply to every frame, so don't mess with that. (I'm just there's a fix for this, but I haven't found it yet).
Continue repeating this process for each letter in this frame until they've all moved the amount you'd like. At this point, hit the drop down arrow on the far right of the timeline bar and hit "tween". Now you have to choose how many frames to add between the two frames you've made. If it's a slight movement like my circling motion, I'd only add 5 frames. If it's a large motion like your letters coming in from a straight line, I'd add 30 or 40 frames to make it smooth. But this is all personal preference and you can tweak with is later. Hit okay to add the frames.
Tween will become your best friend.

Don't worry TOO MUCH about number of frames to add. You can ballpark this and fix the speed in your video editing software. More on this later.
8. Repeat this process (duplicated selected layer, move all your letters around, tween between the two layers) until you have the letters to where you want want them. You can press the "play" button next to the "duplicate frame" button to see how they animation is going to look. I recommend doing this throughout the process to make sure you haven't made any mistakes.
9. Once you've finished your entry sequence, it'll still be backwards. To fix this, select the first frame, and then hold shift as you select the last frame to select all your frames. Then hit the timeline arrow (that leads to the beloved tween) and select "reverse frames". Now everything will be in proper order.
10. If you want the letters to jiggle like mine (gives it a nice, rough feeling), duplicate the frame of your assembled letters and move them around a tiny bit. Tween with 3 frames. Repeat this process 5 times and your letters will hover around and jiggle to perfection. If you want them to sit still, I'd still duplicate the frame and tween with 20 frames so your letters will stay still for some time during the animation.
11. Go to the last frame and repeat this entire tween process to have the letters exit frame. You now have a finished animation. For final touches, select every frame and
a. turn off the "tracking diagram" layer so you only have your grey checkered background again
b. select the time for each frame by clicking the dropdown arrow of any frame and making it .1 seconds (if this is your default, skip the step)
12. You're done! Hit "file > export > render video > okay to save your project. Default render settings work just fine. Also make sure to save this as a PSD for future editing. Now, you can drop this PNG-esque video file as a video overlay in iMovie (or whatever software you use) and you're good to go!
13. You can resize this overlay by selecting it and hitting "video overlay settings > picture in picture". Now you can make it bigger or smaller. I haven't stressed selecting the perfect amount of tween frames because you can tweak with the speed in your video editing software. I realized that my letters came into and out of frame too slow, so I sped them up in iMovie.
And BOOM. You now have a professional title in a not-so-professional editing software. Congrats, you've beat the system.
14. I've never made a tutorial blog post before, so let me know how this came out. Mostly importantly, were you able to successfully follow along and recreate this process? What worked? What could be improved? Should I make more of these? Shoot me an email with feedback! It'd be super helpful.
